
Tuesday, January 26, 2010
Snowflakes
This is what the cut file looks like on the Gypsy before it is put together. See the post from yesterday


Monday, January 25, 2010
Snowflakes
Another idea for the shower are these candy holders or a battery operated candle. Had a hard time photographing so this is the best that I have. A square bottom with the sides welded to the snowflakes. They have stickles to make them shine and a blue punch snowflake glued to the middle. The are held together with a brad in the corners

Friday, January 22, 2010
Snowflakes
This year my daughter is in a wedding and the shower is next week so we have been working on snowflakes which is the theme.
In this picture is the box I created on the Gypsy, It is approximately 4.25" square by 3/4 in deep. The box is for the cookies that my daughter's future mother in law is making. I welded a snowflake in the center of the box and then cut several sizes of snowflakes and attached them with a brad, then added stickles on them. We made over 70 boxes. 

These are them lined up on the dining room table stacked five high.
Tuesday, November 10, 2009
Craft Show
This was my table for the Craft Show on November 7. One of the reasons that I haven't been posting as much. Been too busy trying to get things finished. Another show on the 29 th but will only be adding a few extra things. You can tell the economy is down but compared to some of the other crafters, I did fairly well. I t was a huge show with over 125 tables. Lots of competition. I was exhausted and thanks to Amy helping, I would still be setting things up.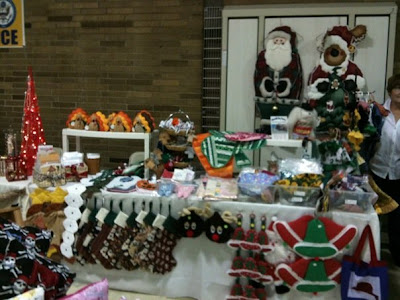

Saturday, October 31, 2009
Happy Halloween
 This is the other project done for Halloween. The letters were 5" and I ended up mounting these on a sheer wired ribbon that blends in with the door. Had trouble with the letters sticking with tape so I used brads to keep the letters on. Worked well with this method.
BOO
Boo! Done just in time for Trick or treat . Mostly done with cuts from Paper Doll Dress Up with various sizes and the witch was from A Child's Year. Cut the letters from Plantin Schoolbook at 11 1/2" cutting the Shadow feature first.


 Used the cuttle bug to emboss the pumpkins. Punched a tiny hole to run the string through so that I could hand it on the door.
Sunday, October 25, 2009
Cardmaking
 I found this card on my computer and I am not sure whether I posted this one before. The trim was the inspiration for the colors. I've had it for years with my sewing supplies. The border is from my favorite punch and stickles was used to add the extra glitz. The sunflower is from Walk in My Garden and Happy Birthday from Zooballoo shadow only feature to give it a bolder look.
Autumn
WOW! I can't believe that its been almost a month since I have posted anything. I have been so busy getting things ready for a craft show but I haven't taken any pictures of the items.

A simple card to celebrate the fall colors of Autumn. A simple tree cut out and then the leaves were added scattered on the paper. Stickles add that extra sparkle.
Monday, September 28, 2009
Craft Fair Items
Been so busy getting ready for a craft show in November that I haven't been posting. These are scarves that are reversible that you slip onto the collars.
 These are scarves that are reversible that you slip onto the collars.
 Tuesday, September 15, 2009
Cardmaking
This card was created by my sister in law, using the Cricut. The flower was from Walk in My Garden. Also the Cuttlebug, Swiss Dots border was used. Very simple design of the card but the flower had a raised layer, and the rubber stamp was added.

Saturday, September 12, 2009
Embroidery
Almost back to school project, was to get my Grand Daughter A purchased bag, a look of its own. It was to match her lunch bag. I embroidered flowers on stabilizer and organza. I sewed out the flowers and cut them out and just attached them to the bag with a satin stitch in the center. The butterfly was also done in the same manner. The embroidered frog had to be appliqued on with a small satin stitch all around. This was so I didn't have to take the bag apart and it looked nice from the inside. Too hard to attach to the hoop and try to stitch.

I guess its been awhile since I posted anything! Its not that I haven't been creating, but with company and other activities it was getting harder for me to post.
There is a new contest on the Cricut Message board: They have just released their 100 cartridge. So ready for the upcoming season.
http://www.cricut.com/shopping/ProductDetails.aspx?id=361&s=1&sc=2
There is a new contest on the Cricut Message board: They have just released their 100 cartridge. So ready for the upcoming season.
http://www.cricut.com/shopping/ProductDetails.aspx?id=361&s=1&sc=2
Tuesday, August 4, 2009
Cardmaking
With school about to start in a few weeks, Fall and Halloween won't be far behind. I created this card using the Wild Card cartridge. Not much work when the cartridge does all the size calculations for you. Added some stickles too. You have to think a little on what colors goes where to cut it out. N0t something that you want to do when your tired.

Monday, August 3, 2009
Cardmaking
I started this card by using my new cartridge "Wild Card". I loaded the yellow paper and wanted to cut the Tied Up card. The largest it would cut was 2 3/4", well that size was too small so I placed that cut in the center of my card and tied it with the black and white ribbon. To get the size that I will need, the next time I Will go in the software program for the Cricut. I used a punch for the white scallop and I had a border of flowers already cut so I put that on the front along with the words on a black card stock that I embossed.
 Inside yellow was also embossed with the small folders.
 I used a punch for the white scallop and I had a border of flowers already cut so I put that on the front along with the words on a black card stock that I embossed.Inside yellow was also embossed with the small folders.

Sunday, August 2, 2009
Cardmaking
This card is a tri fold. Using a stripe paper, then layering it with a rose and light pink paper. The heart is cut from Storybook cartridge page 42 in the book. The words were computer generated
 The on the other flap, i decided it was too plain and used the "Devine Swirls" and a ric rac folder from Cuttlebug.

 The on the other flap, i decided it was too plain and used the "Devine Swirls" and a ric rac folder from Cuttlebug.
Added the sentiment from the computer and mounted it on the darker pink paper. 

Wednesday, July 29, 2009
Cardmaking
I think I am done with Christmas for awhile. It'll be here soon enough.
This card was done for the fisherman in our family, although since we don't go to camp anymore, he hasn't gone fishing. Created in "Going Places card feature and then the inside was a large fish which he says always got away.

This card was done for the fisherman in our family, although since we don't go to camp anymore, he hasn't gone fishing. Created in "Going Places card feature and then the inside was a large fish which he says always got away.

Sunday, July 26, 2009
Craft Fair Items
I'm back, Summer illness does take its toll on me but now I'm better.  I've made this several years ago but it is still in my possession with my Christmas Crafts. I found these two very rich looking stretch velour to make this project and I think it looks better than it would have in calico fabrics. They both are stretchy fabrics which in this project it was easy to work with. Each of the petals are stitches with a very fat batting and slit is made on the back to turn them right sides out and then machine stitched down the center. They are applied on a round flat pillow and the pom poms were added.
 I've made this several years ago but it is still in my possession with my Christmas Crafts. I found these two very rich looking stretch velour to make this project and I think it looks better than it would have in calico fabrics. They both are stretchy fabrics which in this project it was easy to work with. Each of the petals are stitches with a very fat batting and slit is made on the back to turn them right sides out and then machine stitched down the center. They are applied on a round flat pillow and the pom poms were added.
Monday, July 20, 2009
Cardmaking, Christmas
These cut reindeer " Christmas Cheer cartridge" were made with silver paper and a navy shadow. Two different background papers (strips and snowflakes) were cut with scissors for the wave effect. The Joy was from "Joys of the Season and for the finishing touch, silver ribbon and a jewel were added. 

Sunday, July 19, 2009
Cardmaking, Christmas
Snowflakes from Stretch Your Imaginations were cut with the from snowflake -sand the other two were from "Joys of the Season" with Stickles added for that extra sparkle. The Joy was cut from "Plantin Schoolbook" with the end caps feature used. That way the letters were cut and the border also without having to punch out anything so that the ribbon would slip through the holes. The scalloped circle was something that I had cut before and can't remember from what cartridge that was used.

Subscribe to:
Posts (Atom)