
Tuesday, November 10, 2009
Craft Show
This was my table for the Craft Show on November 7. One of the reasons that I haven't been posting as much. Been too busy trying to get things finished. Another show on the 29 th but will only be adding a few extra things. You can tell the economy is down but compared to some of the other crafters, I did fairly well. I t was a huge show with over 125 tables. Lots of competition. I was exhausted and thanks to Amy helping, I would still be setting things up.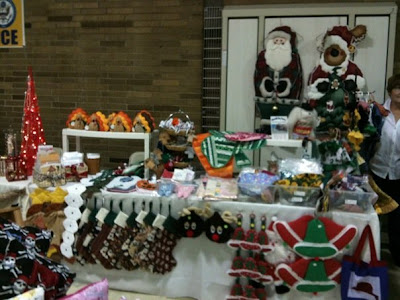
Saturday, October 31, 2009
Happy Halloween
 This is the other project done for Halloween. The letters were 5" and I ended up mounting these on a sheer wired ribbon that blends in with the door. Had trouble with the letters sticking with tape so I used brads to keep the letters on. Worked well with this method.
BOO
Boo! Done just in time for Trick or treat . Mostly done with cuts from Paper Doll Dress Up with various sizes and the witch was from A Child's Year. Cut the letters from Plantin Schoolbook at 11 1/2" cutting the Shadow feature first.


 Used the cuttle bug to emboss the pumpkins. Punched a tiny hole to run the string through so that I could hand it on the door.
Sunday, October 25, 2009
Cardmaking
 I found this card on my computer and I am not sure whether I posted this one before. The trim was the inspiration for the colors. I've had it for years with my sewing supplies. The border is from my favorite punch and stickles was used to add the extra glitz. The sunflower is from Walk in My Garden and Happy Birthday from Zooballoo shadow only feature to give it a bolder look.
Autumn
WOW! I can't believe that its been almost a month since I have posted anything. I have been so busy getting things ready for a craft show but I haven't taken any pictures of the items.

A simple card to celebrate the fall colors of Autumn. A simple tree cut out and then the leaves were added scattered on the paper. Stickles add that extra sparkle.
Monday, September 28, 2009
Craft Fair Items
Been so busy getting ready for a craft show in November that I haven't been posting. These are scarves that are reversible that you slip onto the collars.
 These are scarves that are reversible that you slip onto the collars.
 Tuesday, September 15, 2009
Cardmaking
This card was created by my sister in law, using the Cricut. The flower was from Walk in My Garden. Also the Cuttlebug, Swiss Dots border was used. Very simple design of the card but the flower had a raised layer, and the rubber stamp was added.

Saturday, September 12, 2009
Embroidery
Almost back to school project, was to get my Grand Daughter A purchased bag, a look of its own. It was to match her lunch bag. I embroidered flowers on stabilizer and organza. I sewed out the flowers and cut them out and just attached them to the bag with a satin stitch in the center. The butterfly was also done in the same manner. The embroidered frog had to be appliqued on with a small satin stitch all around. This was so I didn't have to take the bag apart and it looked nice from the inside. Too hard to attach to the hoop and try to stitch.

I guess its been awhile since I posted anything! Its not that I haven't been creating, but with company and other activities it was getting harder for me to post.
There is a new contest on the Cricut Message board: They have just released their 100 cartridge. So ready for the upcoming season.
http://www.cricut.com/shopping/ProductDetails.aspx?id=361&s=1&sc=2
There is a new contest on the Cricut Message board: They have just released their 100 cartridge. So ready for the upcoming season.
http://www.cricut.com/shopping/ProductDetails.aspx?id=361&s=1&sc=2
Tuesday, August 4, 2009
Cardmaking
With school about to start in a few weeks, Fall and Halloween won't be far behind. I created this card using the Wild Card cartridge. Not much work when the cartridge does all the size calculations for you. Added some stickles too. You have to think a little on what colors goes where to cut it out. N0t something that you want to do when your tired.

Monday, August 3, 2009
Cardmaking
I started this card by using my new cartridge "Wild Card". I loaded the yellow paper and wanted to cut the Tied Up card. The largest it would cut was 2 3/4", well that size was too small so I placed that cut in the center of my card and tied it with the black and white ribbon. To get the size that I will need, the next time I Will go in the software program for the Cricut. I used a punch for the white scallop and I had a border of flowers already cut so I put that on the front along with the words on a black card stock that I embossed.
 Inside yellow was also embossed with the small folders.
 I used a punch for the white scallop and I had a border of flowers already cut so I put that on the front along with the words on a black card stock that I embossed.Inside yellow was also embossed with the small folders.
Sunday, August 2, 2009
Cardmaking
This card is a tri fold. Using a stripe paper, then layering it with a rose and light pink paper. The heart is cut from Storybook cartridge page 42 in the book. The words were computer generated
 The on the other flap, i decided it was too plain and used the "Devine Swirls" and a ric rac folder from Cuttlebug.

The on the other flap, i decided it was too plain and used the "Devine Swirls" and a ric rac folder from Cuttlebug.Added the sentiment from the computer and mounted it on the darker pink paper. 

Wednesday, July 29, 2009
Cardmaking
I think I am done with Christmas for awhile. It'll be here soon enough.
This card was done for the fisherman in our family, although since we don't go to camp anymore, he hasn't gone fishing. Created in "Going Places card feature and then the inside was a large fish which he says always got away.

This card was done for the fisherman in our family, although since we don't go to camp anymore, he hasn't gone fishing. Created in "Going Places card feature and then the inside was a large fish which he says always got away.

Sunday, July 26, 2009
Craft Fair Items
I'm back, Summer illness does take its toll on me but now I'm better.  I've made this several years ago but it is still in my possession with my Christmas Crafts. I found these two very rich looking stretch velour to make this project and I think it looks better than it would have in calico fabrics. They both are stretchy fabrics which in this project it was easy to work with. Each of the petals are stitches with a very fat batting and slit is made on the back to turn them right sides out and then machine stitched down the center. They are applied on a round flat pillow and the pom poms were added.
 I've made this several years ago but it is still in my possession with my Christmas Crafts. I found these two very rich looking stretch velour to make this project and I think it looks better than it would have in calico fabrics. They both are stretchy fabrics which in this project it was easy to work with. Each of the petals are stitches with a very fat batting and slit is made on the back to turn them right sides out and then machine stitched down the center. They are applied on a round flat pillow and the pom poms were added.
Monday, July 20, 2009
Cardmaking, Christmas
These cut reindeer " Christmas Cheer cartridge" were made with silver paper and a navy shadow. Two different background papers (strips and snowflakes) were cut with scissors for the wave effect. The Joy was from "Joys of the Season and for the finishing touch, silver ribbon and a jewel were added. 

Sunday, July 19, 2009
Cardmaking, Christmas
Snowflakes from Stretch Your Imaginations were cut with the from snowflake -sand the other two were from "Joys of the Season" with Stickles added for that extra sparkle. The Joy was cut from "Plantin Schoolbook" with the end caps feature used. That way the letters were cut and the border also without having to punch out anything so that the ribbon would slip through the holes. The scalloped circle was something that I had cut before and can't remember from what cartridge that was used.

Saturday, July 18, 2009
Cardmaking, Christmas
Another card to share. Merry Christmas is from "Plantin Schoolbook" cartridge with added glitter and a couple of pieces of candy from "Joy of the Season" with glitter. added ric rac from my sewing stash.

Wednesday, July 15, 2009
Cardmaking, Christmas
In these two cards, a few simple changes were made: The paper is behind the whole front of the card card with the snowman (Stretch Your Imagination Cartridge) and also added snowflakes. On the polar bear (Joys of the Season), I put the snowflake paper only behind the bear. Both had the same cut of "Let It Snow" from the Stretch Your Imagination cartridge using the "Card Frame" key.

Monday, July 13, 2009
Cardmaking, Christmas
Two more cards using the same Joy as in a previous post but this time with the reindeer as the center of attention. The reindeer is from the Doodlecharms cartridge and the Joy from Christmas Cheer cut at two different sizes. I did end up putting a small pom pom for the nose.

Sunday, July 12, 2009
Cardmaking, Christmas
Since I have been busy reading outside this summer and haven't been on the computer much, I thought I would post another picture of cards that I made. The pine cone was made from Joys of the Season and Joy from Plantin Schoolbook. Just done in a little different way with the ribbon and the 2 different fonts. As you can tell the JOY was done in silver paper that has shine to it and on the pine cone, Stickles was again added

Cardmaking, Christmas
This card was made from three different cartridges. The Santa was cut from "Joys of the Season" and was cut at 3" and then Stickles was added to the beard and red for the hat. Stickles was also added to the HO HO HO and was cut from Christmas Cheer. Plantin Schoolbook was the cut for the ric rac and in Design Studio so that I welded a page length of the ric rac and then just cut off what I need for cards. Love the paper of the stripes and was in a special package with from coordinated card stock and papers which make it so much easier finding the right match for your project. 

Thursday, July 9, 2009
Cardmaking, Christmas
Sometimes you have just the perfect match of papers and this patterned paper is one that I love for the holidays. The Joy was cut from Christmas Cheer (banner-s). The gingerbread boy was cut from Paper Doll Dress Up(accessories 2 on page 73. Added brads for the eyes and ric rac cut from Plantin Schoolbook with a bow from a heavy yarn. The stars were a punch.

Wednesday, July 8, 2009
Craft Fair Items
These two items were made from the same pattern which I have had for many years. I believe it is a McCalls pattern. Both were made from a fleece fabric and a high loft batting was used on both. The bow was a calico and an eyelet trim was used for the candy cane. Added a red velvet bow and a silk flower holly for the goose.

Monday, July 6, 2009
Cardmaking, Christmas
When I get a new cartridge, I see what kind of projects they feature in the beginning of the handbook. This is the project featured in Stretch Your Imagination. I did change the size on this one since I didn't like the 4" size that they featured. I did Stickle the snowflakes and did have this eyelash type yarn. Also Stickled the scarf in red and colored the hat black with markers.

Saturday, July 4, 2009
Quilting
Two more projects that I have created: Front and back views of the stars. Each star is made separately and then hand tacked together. The stitching is all done on the machine using invisible thread and a three step stitch to make it look like it was hand done. Back
Back
 Front
Front
 Back
Back Front
Front

Sewing
Today, HAPPY 4TH OF JULY!
I've been out most of the day, and decided to post Patriotic projects that I have created.
 Starting with a baby bib made from a star fabric and a stripe fabric. The "Born in the USA was embroidered before I put the bib together, then satin stitched the star fabric onto the stripes.
Added velcro to the neckline for a closure.
Friday, July 3, 2009
Cardmaking, Christmas
This card was designed and cut in Design Studio software using Christmas Cheer cartridge. And on the inside, there is a pocket on the inside to add a gift card. Although you cannot see it in the picture the right side of the card is shaped like the package. You can do this with most any cartridge shape, just weld it to a rectangle. I do cut first on scrap paper first to test the cut, then cut on your card stock and other papers.

Thursday, July 2, 2009
Cardmaking, Christmas
This is the card that I made for all my Red Hat friends in our group. Very Large group and I had to make 30 cards. Using Silver paper, I cut out the Ornament at 4 1/2". Then cut the top in a gold paper with the Layers feature. The snowman was cut from Doodlecharms @ 2 1/2". When I did this I used the software program so that I could maximize cuts without wasting too much paper. Also in the software, I cut out the hat and sized it to the snowman from the Paper Doll Dress Up cartridge and cut out 30, then on the final card, I did stickle the hats. The snowflakes were from a border punch and arranged them around. I also cut a back using the blackout feature.
 This is a picture of all but a few cut and ready for their envelopes. Love how the silver reflects the light. Could also hang on the tree for an ornament.
 .
.
This is a picture of all but a few cut and ready for their envelopes. Love how the silver reflects the light. Could also hang on the tree for an ornament. .
.Wednesday, July 1, 2009
Craft Fair Items
Since I started posting some of my Craft Show Items yesterday and there were Christmas things, I decided to start "Christmas In July" like they do at some stores, so here is my post for today.
 This a Santa that was machine appliqued, changing threads for the different colors. The beard was the last thing that was stitched out of white long fake fur. A pom pom was also added to the top of the hat. After the stitching was done, I inserted it in a wooded craft hoop and glued small eyelet trim to the back. The hanger is the top of the hoop.
 This a Santa that was machine appliqued, changing threads for the different colors. The beard was the last thing that was stitched out of white long fake fur. A pom pom was also added to the top of the hat. After the stitching was done, I inserted it in a wooded craft hoop and glued small eyelet trim to the back. The hanger is the top of the hoop.
Tuesday, June 30, 2009
Craft Fair Items
Get ready for Christmas: And to add a few more items to the list besides embroidered items on the blog already Here are two different Joy Banners either for the wall or door. The bells are stuffed and the word JOY is machine appliqued. The other is made with Joy appliqued and quilted.

 . The door knob decorations are appliqued with different designs. Also Santa and angels, gingerbread men and Noel can be done with the same technique.
 Here are two different Joy Banners either for the wall or door. The bells are stuffed and the word JOY is machine appliqued. The other is made with Joy appliqued and quilted.
 . The door knob decorations are appliqued with different designs. Also Santa and angels, gingerbread men and Noel can be done with the same technique.
Craft Fair Items

 I am starting to get back into Craft Fairs after
several years away because of illness. These are the Turkeys that I have made.
The bodies are stuffed and the back has backing and is quilted. The printed colors are fabric gathered in various sizes.
Monday, June 29, 2009


Sunday, June 21, 2009
Graduation
 I'm still on graduation projects, so this is a sign that was made to guide guests to the yard. Done in Plantin Schoolbook for the lettering with the end caps feature, and the hat was made from Locker Talk mounted on a thick sheet of 12 x 12" paper
Thursday, June 18, 2009
Back Again
WoW! I haven't posted anything for a month. Been Too busy with graduation party, yard work, and just getting back from a family reunion in TN. I have been doing other things but just not getting back to the blog to pot them. So here I come again with some things that I have done.

This cake was not done by me but I have to share with everyone. It was made for the party by my daughters boyfriends mother, Lynda. She traveled 2 1/2 hours to bring this beautiful cake and then she assembled it at my house. The bottom layer is white with white frosting, then chocolate with chocolate frosting, the hat part was white cake with chocolate. She outdid herself and we are very thankful that she did! She is a very talented!
Subscribe to:
Posts (Atom)