Birthday Cards

Monday, February 28, 2011

Baby Card

Doodlecharms was one of my first cartridges that I bought and still love it for all the variety of images that is included. In the front of the handbook, all the cartridges have a project included to help get you started in using your Cricut so I would recommend that at least you try one when you get a new cartridge or at least read through it. I know the are some books that I had no use for the project so the reading part was helpful.

This card was one of these projects but with a little variation. I cut the card out of Plantin schoolbook and that leaves those holes on the edge of the card. I sometimes put embroidery thread through them. The bag was cut at five inches and the head was cut @ 1.5" and bottle were cut at 2" I believe. Baby was cut from Plantin schoolbook and sized to fit. I had these star brads and attached the handle with them. Another simple project but needed this in a hurry.


Friday, February 25, 2011

Masculine birthday cards

SNOW DAY!(again)

So I Decided to work on some more "guy cards" I just bought the Paper Lace cartridges yesterday and while looking through the booklet, I found a few cuts that would make guy type cards.

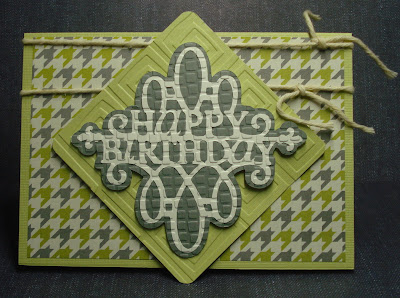
Not always happy with the papers that I have, I found this hounds tooth print in gray, cream and bright green and searched for a few solids to match. The "Happy birthday cream color was cut from page 53 Lace 2 @ 3 3/4" and the shadow from gray card stock and then run through the Cuttlebug. Thought it needed something so I cut a rectangle out of the green also at 3 3/4" and mounted it using pop dots for raised effect. It does extend above the card at the top and bottom. The next card using the same paper is from page 46 Lace 1 cut @ 1.70"( sized to fit the width of 5.5" of the A 2 card on the Gypsy. Also the shadow was cut from gray card stock. Using George I cut the HAPPY out at about 1", and the BIRTHDAY at .70 real size dial was on for both cuts. I ended up cutting strips of green to mount the letters to the card because I felt the print was too busy to handle the letters.


The third card was cut from page 49 @ 1 7/8" but I did change my mind in the size of the card so I ended up cutting the last section off with scissors. I thought it looked too plain so again I ran it through the Cuttlebug but still needed something and found these gray brads in the middle squares. The Happy Birthday was cut from Gypsy Wanderings but increased the size of the "birthday" on the Gypsy


Thursday, February 24, 2011

Vote for these two wonderful people


http://ultimateweddingcontest.com/entry/132154 Amy and Dustin ---Long Distance Love


These are two people that should win the wedding contest. Both great kids who have worked hard in their lives to achieve goals they set for their life together. Amy started working in high school and went six years to college to get a degree and payed for her schooling on her own. Dustin also went to school and works in web designing. All that time they commuted on weekends to see each other taking turns from his house to ours.


Due to many circumstances in our lives, my husband who has not worked since 2002 due to the steel mills shutting down and then me coming down with cancer, we cannot afford to give them the wedding of their dreams but if you or anyone you know could vote for them in this contest it would be greatly appreciated. Thank you and good luck to them.

Wednesday, February 23, 2011

Elmo Pop Up Card

After finally getting the Elmo Party a few weeks ago, I just finished the pop up card.

Too cute is the face smiling at you. I have no small children but wanted this cartridge and the Toy Story one which I haven't used yet either. I always figure that the Licensed cartridges won't be here for very long and when I have a use for them, they will be gone. There are some cute projects on the cartridge that with a little changing on the Gypsy, I can create something general by taking off the face, it can be used for anyone.

The Happy Birthday is one of the cuts from my "stash" (I cut a few sayings from different cartridges at one time so all I have to do is match it to a card).
When you open the card surprise! Elmo pops up! I did make two of these cards so that one would be a reference for another time. I did have a little trouble getting him to stick and wrinkled his leg. had to go on the message board for instructions because as usual no help in the booklet!


Tuesday, February 22, 2011

Masculine birthday card

Another card with the same color scheme as yesterdays post.

Used the same Happy birthday stamp before I did the embossing on the front of the card using the Script folder.
The four squares were cut in the Cuttlebug and then embossed with the folders that were included when you purchased the product. Added the raffia to complete the card and inked the edges of the card.

Simple but I hope it will be enjoyed. Always harder to find cards that work for the men.

Monday, February 21, 2011

Masculine birthday card

I have some birthdays for some guys soon and its always so hard to find something for them. So I was on the hunt for something to cut and did cut cars, trucks and other things from this cartridge.

I first stamped the Happy birthday from a stamp from Stampin Up, then used the distressed stripes folder to emboss. I thought it looked a little plain so I cut the frame from Heritage cartridge and sized it to fit in the Gypsy. Most everything that I cut I use the gypsy so I don't have to keep switching out my cartridges from the Cricut.

I chose the horse and buggy for this card and I think it was cut at around 2 1/2". Added a cream shadow. Used pop dots to attach it to the card.

Sunday, February 20, 2011

Archivers free projects

This weekend until Monday, Archivers has free projects for you to try using different techniques. These are the samples that I did on Friday: tag, envelope card and a scrapbook page. You don't have a choice of papers but I did learn several new things. The first is a tag. Using corner chompers, punched petals, and embossing. For the flower, the base was a snowflake so that you can place the petals evenly after you add dimension by using a foam base and using a stylus. Added Stickles to the center of the flower which looked like another snowflake.
The second is a card that was pre cut using a cutting folder that created an envelope . Embossed the background gold color through a Sizzix but before that you stamped the table, saying and lamp. The chair and lampshade were stamped on a printed paper and then attached with foam dots. Added sparkle to the lamp base with a glitter pen and rhinestone stickers to the back of the chair. A brad was added to the closure using a brad setting tool which can save the fingernails.

The last picture is the scrapbook page. Almost every thing is already set up before you start.
The Happy Birthday on the white half circle is a rub on. 3 different stamps were used for pennant and then you cut out. The border was a punch but they already had it ready for you to use and all you had to do is attach. The large blank area is where you can place your pictures.


Thursday, February 17, 2011

Cow card

Just using the Cricut, I cut this card out for someone who loves cows! It was in Paper Doll Dress Up and at the time it was the only cow that I had so that I had to cut the cows in different colors to get all the elements cut. The white border was actually the extra cut from a frame that I made and had these pieces leftover, added the Stickles. Just a circle for the "moon" from PS.

Wednesday, February 16, 2011

Birthday Cards

So being on the web, you see what others are doing and these flowers seem to be one of the newest items. Cut out from George cartridge at from 1" to 3" at 1/4" intervals. I cut them on the Expression and just changed the dial for the size. You then spritz them with water and scrunch up to wrinkle the paper, let them dry and then inked the edges and centers. I used four layers and then the smaller layer I made the small flower.Close up flower.
I also cut the leaves, wet them and wrinkled but used a Spellbinders folder in 3 different sizes.

The background paper has the green and pink swirls in the print. Stamped the Happy birthday and rounded the corners.

Tuesday, February 15, 2011

Candle Mat

Before Valentine's day, I created this candle mat, done with cuts from the Cricut. I did use the Gypsy for the sizing of the hearts which were cut from 4 colors of wool.
I used the Cricut to cut the hearts out of fusible web then fused to the back of the wool and then cut the hearts out. I didn't want to put the wool through the Cricut because of the fibers were too fuzzy and would create a problem on the mat and harder to clean.
The white background pattern was also created on the Gypsy by welding 4 hearts together and then traced on the wool. After fusing the hearts, I felted them onto the background but then used a applique stitch around the largest heart. The cuts were from the Sweetheart cartridge. I tried to use the scallop heart for the largest heart but even at 3" there were too many scallops to show up on the final heart. After I felted the hearts, I stitched onto a piece of wool felt and cut about a quarter inch larger.

Sunday, February 13, 2011

Birthday Card

Using the Wild Card cartridge, I created these two cards sizing them on the gypsy. Both are embossed using Cuttlebug folders although it is hard to see in these pictures.
On the inside, I just cut the paper to fit so that when the card is closed the print shows through. I took the flame cuts and just glued the backs and just placed the by using the opening for the flames, then used Stickles to make them sparkle.


Used the "Happy Birthday from A Child's Year for the greeting. Since there is not a shadow or blackout on this cartridge, I went into the Gypsy Hide feature to remove some of the lines on the inner part of the words. On the second card, it does show better with the solid background but that is why I usually make two of the same type of card.

Saturday, February 12, 2011

Masculine birthday cards

A couple of more cards done with the same paper done in a previous paper. Love this combination and I think that they make great cards for a male in your life. The Happy Birthday was cut to fit the rectangle from the Don Juan cartridge. All I did was back it with white card stock and put it through the Cuttlebug. Strips of paper were cut 1/4' smaller than the A2 size, then used a punch to cut the stars and used foam squares to mount them. Photographed on the brown polka dot paper

Friday, February 11, 2011

Valentine's cards

Here are another group of cards for Valentine's day. Having trouble with my camera so sorry they are so blurry.
This mouse was created from a scallop heart that I got the idea fro The Yellow Canary website using wiggle eyes.
Smiley cartridge that was a free download for the gypsy from Cricut. Used the Martha Stewart punches which is a set of two so that you have the corner punch. You have to use a certain size paper in order to create a rectangle and is written on the directions..
Larger mouse card layered over other scalloped hearts. Need to get a black thread yet for the whiskers.
All the word cards were from a kit already printed


Thursday, February 3, 2011

Masculine birthday card

I was looking for ideas to create a card that looked more masculine. It came from a card that someone else created from the Cricut message board!

I had these papers that coordinated and picked up the blue from some card stock scraps. To give the texture, first I ran the card with the squares glued in place, stamped the Happy birthday, cut the stars and then also placed them in the Cuttlebug folder. Used the dimensional dots to the stars and birthday.


Wednesday, February 2, 2011

Valentine's Day Cards

A few quick cards that are made 3" x 3"( cut 3" x 6") from scraps of card stock. Archievers has a class on these size cards using different techniques. The first one is made with a Martha Stewart punch and just one centered punch per side which leaves you with the square corners and middle. I took the embossing folder that originally came with the Cuttlebug for the center. Have yet to add maybe small hearts to the corners. Used mounting dots to pop it out with a print paper base.

In this group of three, it was a paper kit that had the paper, stamps, sayings that I found in our local clearance store. The middle card, I used a punch but found that it took too big a bite out of the 3" so the paper was on the inside with a sticker on the bottom. The stickers on these cards already had the dimensional dots so they "pop up". These are just a few quick cards that I will be posting for Valentines day in the next few days.