 Although the card is the fronts only, when you open the card, the baby face is glued between the buggy so that the face is visible from both sides.
Monday, March 8, 2010
Cardmaking
Two cards to go with baby gifts were created in Wild Card. Changed size so that it would fit in a A 2 envelope. Had to cut the buggy twice (Liner feature) in order to get the different colors and then cut and arrange the pieces. Added stickles to some parts of the design to add the sparkle. The baby was cut from Doodlecharms, added ribbon, marker for the face.  Although the card is the fronts only, when you open the card, the baby face is glued between the buggy so that the face is visible from both sides.

Saturday, March 6, 2010
Cardmaking
A card in a hurry is what this one is all about! Simple! Great textured black paper that was cut 1/4" smaller than card size in which I rounded the corners with a punch. The Happy Birthday in white was cut from Zoobaloo and was in my stash of cuts so that all I had to do was glue on the paper. I also had the black and white check ribbon and glued in place. Had to come up with something that looked masculine in a short period of time but couldn't get in the creative mood.
 The Happy Birthday in white was cut from Zoobaloo and was in my stash of cuts so that all I had to do was glue on the paper. I also had the black and white check ribbon and glued in place. Had to come up with something that looked masculine in a short period of time but couldn't get in the creative mood.
Friday, March 5, 2010
Fleece Baby Quilt
A fleece baby quilt that I made for a great granddaughter that should be born soon.
I bought pink and white fleece and rotary cut it into 6 1/2" squares (size of the ruler). I marked the center of the white squares so that I could embroider them. Next, hooped water soluble stabilizer only, placed the fleece on the stabilizer (did not hoop fabric) and used a basting stitch to hold the fabric in place. I wound bobbins with the rayon thread to match the top thread, this is so that it looks finished from both sides as you can see in the pictures. The designs were actually an applique but I just ran the design without adding the top fabric. After everything was embroidered I laid out the design on the table alternating plain pink squares with the white ones. Using a stretch needle, an even feed foot, I sewed the squares together with 1/2" seams in rows with a triple stitch. I needed to make it larger so that I added rows of a border around the edges cutting fleece 3 1/2". The next part I did while watching tv and that was clip being careful not to cut into the thread. It looks cuter than the pictures show. I hope she enjoys it.
I bought pink and white fleece and rotary cut it into 6 1/2" squares (size of the ruler). I marked the center of the white squares so that I could embroider them. Next, hooped water soluble stabilizer only, placed the fleece on the stabilizer (did not hoop fabric) and used a basting stitch to hold the fabric in place. I wound bobbins with the rayon thread to match the top thread, this is so that it looks finished from both sides as you can see in the pictures. The designs were actually an applique but I just ran the design without adding the top fabric. After everything was embroidered I laid out the design on the table alternating plain pink squares with the white ones. Using a stretch needle, an even feed foot, I sewed the squares together with 1/2" seams in rows with a triple stitch.
I needed to make it larger so that I added rows of a border around the edges cutting fleece 3 1/2". The next part I did while watching tv and that was clip being careful not to cut into the thread. It looks cuter than the pictures show. I hope she enjoys it.Wednesday, March 3, 2010
Cricut
Tags, Bags, Boxes and More: Cut at 8.8"m H and 11.89" L with the Gypsy settings. On page 121 in the book, Feature is Window so that the heart shape is cut out. Fit to page on the Cricut Expression gets the cut at 8.5"L so that using the Design Studio or Gypsy, the size can be adjusted a little larger. It was too plain for me so I ended up adding white X O on the top heart that was Stickled and on the sides, the cupid reversed so they were facing the same way. (No picture yet). 
I find the hardest thing for me to do is with the limited software and my camera, everything has to be edited to upload to the site to fit. Sometimes access to the computer is limited.

I find the hardest thing for me to do is with the limited software and my camera, everything has to be edited to upload to the site to fit. Sometimes access to the computer is limited.
Sunday, February 28, 2010


Valentines Table runner
Before the month is done, I thought I would post some of the projects that I did from Valentine's day. Here is a quilted table runner done with two panels of a pre printed panel that I bought two years ago in San Marcos, Ca. at Eleanore Burns store " Quilt In A Day". Very simple and outlined quilted with nylon thread in the top and red rayon thread in the bobbin, around the baskets to make it look like hand quilting. Just trying to finish things up around here.

Friday, February 26, 2010
Thanks card
I just bought this Martha Stewart Punch the other day ( actually a corner and border punch in one). The only thing is with this punch, you have to cut your paper a certain size in order for it to work so I just used the corner punch on two different papers.
This card was inspired by a project in one of the new cartridges that was just announced. A tri fold using the same colors as the other cards posted earlier. I did use Storybook cartridge for the black border (fancy corner N floral on page 41 of the handbook)2" and then the middle was cut in half (W fancy corner on page 50) " Thanks"was cut from Gypsy Wanderings. I did have black velvet ribbon and put it through a slider created with Christmas Cheer. A small flower was also cut from GW and glued to the ribbon.
 I do like the way it turned out except for the fact that it is 6" x 7" according to the directions.
This card was inspired by a project in one of the new cartridges that was just announced. A tri fold using the same colors as the other cards posted earlier. I did use Storybook cartridge for the black border (fancy corner N floral on page 41 of the handbook)2" and then the middle was cut in half (W fancy corner on page 50)
 " Thanks"was cut from Gypsy Wanderings. I did have black velvet ribbon and put it through a slider created with Christmas Cheer. A small flower was also cut from GW and glued to the ribbon.
 I do like the way it turned out except for the fact that it is 6" x 7" according to the directions.
Friday, February 19, 2010
Cardmaking
These are two new cards that were created using the same color scheme and papers. I had seen these ideas in a Crafts and Things Magazine issue (Aug. 2009) I did change things around on the cards but the idea was from the magazine. The wording for this card was welded together on the Gypsy to have a one piece word. The next one that I do will have a bit of changes made. Butterfly is from Gypsy Wanderings with the light printed paper cut shadow, then layered with the orange. There is dimension to the butterfly that doesn't show up in the photo but foam squares are mounted on the back.

 The wording for this card was welded together on the Gypsy to have a one piece word. The next one that I do will have a bit of changes made. Butterfly is from Gypsy Wanderings with the light printed paper cut shadow, then layered with the orange. There is dimension to the butterfly that doesn't show up in the photo but foam squares are mounted on the back.

Monday, February 15, 2010
Snowflake shower
A few pictures from the shower as posted earlier. The tulle with the lights inside also have snowflakes that were machine embroidered on organza and tacked on with a basting gun from my quilting. Centerpieces on the main table showing the paper snowflakes that were scattered around.

Another table with decorations. They had such a limited time to do the decorations before the shower.

 Centerpieces on the main table showing the paper snowflakes that were scattered around.

Another table with decorations. They had such a limited time to do the decorations before the shower.

Sunday, January 31, 2010
Snowflakes
To continue our theme for the snowflakes. The same flakes on the boxes were added to a album for the shower with the lettering from Gypsy Font welded together. Snowflake folder for the Cuttlebug added the texture to the blue with a little bit of Stickles added although it is hard to see in this photo.

Wednesday, January 27, 2010
Snowflakes

Don't these look good! They are baked by Lynda (who will be my daughters mother in law , hopefully soon) : www.lyndalu.com They are going into the snowflake boxes. Much too pretty to go in the box but that was the original plan. Just an extra surprise for the guests that receive them.
Tuesday, January 26, 2010


Snowflakes
This is what the cut file looks like on the Gypsy before it is put together. See the post from yesterday

Monday, January 25, 2010
Snowflakes
Another idea for the shower are these candy holders or a battery operated candle. Had a hard time photographing so this is the best that I have. A square bottom with the sides welded to the snowflakes. They have stickles to make them shine and a blue punch snowflake glued to the middle. The are held together with a brad in the corners

Friday, January 22, 2010
Snowflakes
This year my daughter is in a wedding and the shower is next week so we have been working on snowflakes which is the theme.
In this picture is the box I created on the Gypsy, It is approximately 4.25" square by 3/4 in deep. The box is for the cookies that my daughter's future mother in law is making. I welded a snowflake in the center of the box and then cut several sizes of snowflakes and attached them with a brad, then added stickles on them. We made over 70 boxes. 

These are them lined up on the dining room table stacked five high.
Tuesday, November 10, 2009
Craft Show
This was my table for the Craft Show on November 7. One of the reasons that I haven't been posting as much. Been too busy trying to get things finished. Another show on the 29 th but will only be adding a few extra things. You can tell the economy is down but compared to some of the other crafters, I did fairly well. I t was a huge show with over 125 tables. Lots of competition. I was exhausted and thanks to Amy helping, I would still be setting things up.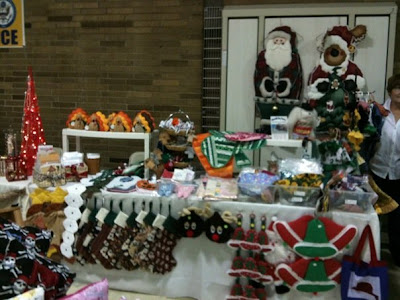

Saturday, October 31, 2009
Happy Halloween
 This is the other project done for Halloween. The letters were 5" and I ended up mounting these on a sheer wired ribbon that blends in with the door. Had trouble with the letters sticking with tape so I used brads to keep the letters on. Worked well with this method.

BOO
Boo! Done just in time for Trick or treat . Mostly done with cuts from Paper Doll Dress Up with various sizes and the witch was from A Child's Year. Cut the letters from Plantin Schoolbook at 11 1/2" cutting the Shadow feature first.


 Used the cuttle bug to emboss the pumpkins. Punched a tiny hole to run the string through so that I could hand it on the door.


Sunday, October 25, 2009
Cardmaking
 I found this card on my computer and I am not sure whether I posted this one before. The trim was the inspiration for the colors. I've had it for years with my sewing supplies. The border is from my favorite punch and stickles was used to add the extra glitz. The sunflower is from Walk in My Garden and Happy Birthday from Zooballoo shadow only feature to give it a bolder look.
Subscribe to:
Posts (Atom)